Wholesale Procurement
Lace Top Sheitel Sample Evaluation: The Buyer's Checklist

The sample has landed on your desk. Between that box and a production order sits one decision that protects your boutique from an entire season of problems: whether the lace top sheitel in your hands reliably becomes the units your clients will wear. Most disputes between buyers and wig factories trace back not to bad manufacturing, but to a sample that was approved by impression instead of by record.
This guide is written from the factory side of that handshake. At LEV Wigs we prepare lace top samples specifically so a buyer can judge them — and the buyers who evaluate methodically are the ones whose production orders arrive matching what they approved. The difference between those buyers and the rest is not experience. It is procedure.
What follows is the full evaluation sequence: the record you set up before the sample arrives, the physical checks in order, the combing and wear observations, and the written approval that converts a good sample into a binding production reference. If you are still selecting a factory, our kosher wigs wholesale supplier guide covers that earlier stage; here we assume the courier has already done his part.
Preparation
Before the Sample Arrives: Set Up Your Evaluation Record
A sample evaluation starts days before the parcel is opened. The single most useful artifact is a written brief — the same specification document you intend to use for the production order — covering lace grade, hair origin, density, length, cap size, color reference, and whether the top is lined or unlined. Evaluating against a written brief, rather than against memory of a WhatsApp photo, is what turns opinions into findings a factory can act on.
Prepare four things before the courier arrives:
- The order brief. Every check in this guide ends by comparing the sample against something you wrote down earlier. No brief, no baseline.
- An evaluation sheet. One page, one row per checkpoint, three columns: what you expected, what you observed, and the action it requires. The table in the approval section below gives you a ready-made version.
- Neutral daylight. Evaluate under daylight or daylight-balanced light, near a window if possible. Warm indoor bulbs flatter color; showroom LEDs flatten lace texture. Both mislead.
- Reference materials. Your color swatch or the reference unit the color is matched to, a soft measuring tape, and a wide-tooth comb plus the brush you actually sell to clients.
One more preparation pays for itself: photograph the sealed parcel and the sample as it first emerges, before any handling. If a dispute about transit damage or a wrong unit ever arises, the timestamped before-photos settle it in one exchange.
Physical Checks
Inspecting the Lace and the Knots
Work through the lace in three passes, because each pass exposes a different failure mode.
First pass — the lace itself. Hold the top section up to the window and look through it. You are checking the mesh for even weave, for snags or runs, and for discoloration along the edges. Run a fingertip across the lace surface: quality lace feels consistent across the whole top, while compromised patches feel stiffer or rougher where the finish has broken down. Check the lace edge perimeter for fraying or unfinished borders, which is where daily handling attacks first.
Second pass — the knots. Turn to the underside and examine the knot work under direct light. On a lace top sheitel the knots should sit close to the mesh and appear reasonably consistent across comparable areas of the top. Press a small section of hair gently against the lace and release; visible movement, sliding, or breakage under the same light handling is a concern to photograph and raise with the supplier. If the knots appear lightened, compare their visibility and strand integrity with the approved sample criteria; this observation can flag a weakness, but it does not by itself establish the processing history.
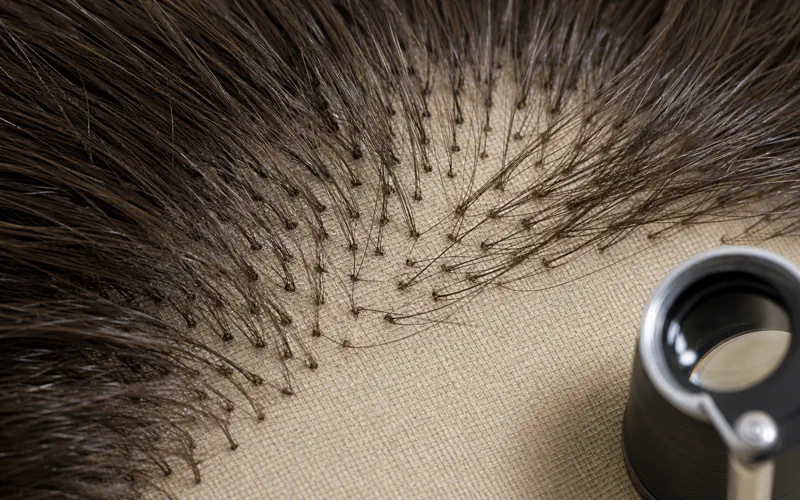
Third pass — the seam between lace and cap. Where the hand-tied lace top meets the machine-made cap body, the transition should lie flat with no ridge, gap, or loose thread. This junction carries the structural load of daily wear, and it is the most common hiding place for corner-cutting.
For what separates HD, Swiss, and French lace at the specification level, see the lace grades section of our lace top sheitels complete guide — the evaluation question here is not which grade is best, but whether the sample matches the grade you ordered.
Physical Checks
Crown, Parting, and Hairline
The lace top exists to produce a scalp-real impression, so judge the three zones where that impression lives or dies.
The crown and part line. Part the sample where your typical client would wear it, then look at the exposed line under daylight. A well-made lace top shows a soft, gradual transition — the kind of density easing that reads as skin beneath hair. What fails an evaluation here: a part line that shows a visible grid, knots that announce themselves as dots, or density that drops off abruptly at the parting rather than tapering.
The front hairline. Study the transition from lace to forehead line. The front should graduate — slightly lighter density at the very edge, building fuller behind it — because a uniformly dense edge reads as a cap, not a hairline. Check that the front lace lies flat when the sample is on a stand: lifting or curling at the front edge will do the same on a client, and no styling permanently fixes it.
The ear tabs and perimeter. Feel inside the ear tabs and along the side perimeter for the same flat, finished construction you demanded at the front. Uneven or scratchy ear tabs are a comfort complaint waiting for your after-sales inbox — and comfort complaints from daily-wear clients are returned units.
Physical Checks
Density and Hair Direction
Density evaluation is a comparison, not an impression. Lift sections of hair at the crown, the sides, and the nape and compare how much light passes through each zone against what your brief specified. Density should be intentional and even within its zone — visibly fuller at the crown than the hairline is normal styling design; patchy thin spots within the same zone are a construction fault.
Direction is quieter but more consequential. All cuticle-correct hair flows root-to-tip in one direction. Check it by combing a small section flat and observing whether the hair lies smooth and stays put, then lift and let it fall — hair that bristles or tangles against itself when brushed in one direction has mixed direction somewhere in the bundle, and mixed direction is the root cause of the chronic matting that appears at a sample's nape after a few weeks of wear.
The density specification itself — how full for which clientele, and how it maps to your market — is covered in the customization parameters of the complete guide. At the evaluation table your job is only to confirm the sample delivers the number you specified.
Physical Checks
Cap Measurement and Fit
Measure the sample before you judge it worn. With the sample on a stand, measure the circumference following the same path the cap sits on a head, then front-to-nape, ear-to-ear, and temple-to-temple. Write each measurement next to the figures in your brief. A cap that deviates from the agreed measurements at sample stage is telling you, politely and in advance, what every unit in the production run will do.
Then evaluate fit on a real head — yours, a colleague, or your most size-typical client model. You are checking three things: whether the cap sits where a cap should without sliding during normal head movement, whether the perimeter exerts even pressure with no specific point that pinches, and whether the stretch zones flex and recover instead of staying bagged out after removal. A sample cap that is uncomfortably tight in one spot will generate the same complaint across a whole order.
For custom cap sizing — including non-standard measurements for clients who need them — the specification route is described on our lace top sheitels wholesale page, where sample terms and the order flow are confirmed before your studio evaluates construction.
Physical Checks
Texture, Color, and Consistency
Run the hair through your fingers from mid-length to ends and document observable surface behavior: drag, residue, static, stiffness, and luster. Touch alone cannot prove cuticle alignment or processing history. If the hair feels heavily coated, unusually stiff, or changes after the agreed wash routine, record the result and ask the supplier to explain it before approval.
Color evaluation happens in two comparisons under neutral daylight. First compare the sample with the approved swatch or reference unit at the root, through the length, and at the ends. Then, if you received more than one sample, compare the samples with one another. Record any variation photographically and against the tolerance in the brief; visual consistency supports the approval decision but does not by itself prove how the color was produced.
The hair assessment section of the complete guide explains the sourcing terms buyers may encounter. At evaluation, confirm the sample against observable fields in the approved specification; sample behavior alone cannot prove geographic origin.
Performance Checks
The Combing Test: Movement and Early Shedding
The combing test is a repeatable handling check, not a laboratory test. Start at the ends and work upward with your wide-tooth comb, then repeat with the brush specified for the evaluation. Watch two things.
Movement. Healthy lace top hair moves as a mass — it parts, falls, and reassembles without resistance. Stiff movement that holds a comb track, or hair that flies apart with static under ordinary brushing, points to coating damage or a moisture problem that will define the unit's whole service life.
Shedding, read consistently. Use the same section, brush, and counted number of passes for every sample, then record the amount and location of loose hair. Repeated localized loss near the lace deserves closer inspection of that zone and written follow-up with the supplier. The handling test identifies a concern; it does not by itself establish the manufacturing cause or predict the behavior of every production unit.
A note on expectations: evaluate shedding relative to the wearing reality of your clients, not against a zero-hair fantasy. The question is whether the sample sheds like a well-made hand-tied unit or like a compromised one — pattern and location tell you which.
Decision
Writing the Approval Record: Approve, Correct, or Reject
Every check above now funnels into one document. An approval record that works has three properties: each finding is written against the brief, each deviation carries a requested action, and the decision names its conditions. Verdicts like "looks good" or "not quite right" transfer nothing to the production order; "density at the crown reads visibly fuller than the specified level, please confirm the production units match the agreed specification" transfers everything.
The record below is the working checklist we recommend to buyers evaluating one of our samples. Copy it, print it, and fill it in as you go:
| Checkpoint | What You Verify | Result and Action |
|---|---|---|
| Lace integrity | Even weave, no snags or runs, clean edges, consistent surface feel | Pass / corrective note |
| Knot work | Tight, even knots; secure under light pressure; bleach did not weaken hair | Pass / corrective note |
| Crown and part line | Gradual density taper at the part, no grid visibility, no dot-row of knots | Pass / corrective note |
| Front hairline | Graduated edge density, lace lies flat, no lifting at the perimeter | Pass / corrective note |
| Density by zone | Matches the specified level; even within each zone | Pass / corrective note |
| Hair direction | Lies smooth one direction, no bristling or self-tangling when lifted | Pass / corrective note |
| Cap measurements | Circumference and lengths recorded against the brief figures | Pass / corrective note |
| Fit on head | Sits stable, even perimeter pressure, stretch recovers | Pass / corrective note |
| Texture and color | Root-to-end color match under daylight; natural surface behavior | Pass / corrective note |
| Combing test | Free movement; no localized repeating shedding from any zone | Pass / corrective note |
| Decision | Approve / approve with corrections / reject — with conditions named | Signature and date |

Three outcomes close the record, and the distinction matters:
| Outcome | When It Applies | What You Do |
|---|---|---|
| Approve | Sample matches the brief across all checkpoints | Sign, date, seal the sample as the production reference |
| Correct | Deviations are fixable specifications: color drift, density trim, cap adjustment | Approve conditionally; require the correction confirmed in writing, then re-check on the corrected unit |
| Reject | Structural failures: unstable knots, lace faults, mis-sized cap, wrong hair behavior | Document the findings with photos, state the non-negotiables, and decide whether a new sample is worth the round |
One habit protects this entire framework: record exceptions even when you approve. The kosher wholesale guide puts the principle plainly — approval notes give the factory a measurable production reference. A clean approval with no notes is a weaker document than an approval that names what was borderline and what tolerance you accepted.
Decision
Which Issues Go Back to the Factory
Not every finding deserves a factory round-trip, and misrouting corrections wastes the calendar weeks a correction round actually costs. Sort every deviation into two piles before you write to your supplier.
Factory corrections are findings rooted in how the unit was built: unstable knots, lace flaws or fraying edges, a cap that misses the agreed measurements, color outside the accepted tolerance, or density that differs from the specified level. Raise these before production because they may indicate a repeatable specification or process risk; document the zone and deviation rather than assuming every unit will reproduce it exactly.
Local adjustments are the work your own bench or macher does better and faster than a factory round-trip: a trim to the perimeter shape, personalizing the cut, thinning a style that was ordered full, or adding the styling finish your particular client expects. Routing these to the factory mislabels your own service layer as a manufacturing fault — and a sheitel macher exists precisely to own that layer between factory output and the client's head.
The sorting question is simple: will this issue reproduce itself in every unit of the order? If yes, it belongs to the factory. If it is specific to styling preference, it belongs to your bench. Write each factory-bound item as a measurable instruction — the zone, the deviation, the requested result — and your correction round ends in one exchange instead of three.
Production
From Approved Sample to Production Specification
Approval is not the end of the sample's job. When both parties agree in writing, the approved unit can be retained as a physical reference alongside the purchase specification. The agreement should state which attributes the reference controls and how later differences will be reviewed.
- Identify the approved unit. Label it with the article, date, and signatory, then store it unworn, unstyled, and protected from light. Record in writing whether both parties accept it as a reference and which specification fields it controls.
- Translate the record into the purchase order. The written specification your order rides on should carry the exact brief the sample was evaluated against, plus every tolerance you noted in the approval record. Any deviation your production units show at incoming check is now measured against two references: the paper and the sealed sample.
- Confirm the incoming-check arrangement. Agree with the factory what inspection is performed per unit before shipment and whether it is documented per unit or sampled, and ask that orders ship with a specification sheet to check goods against on arrival. Our complete guide's inspection and documentation section frames these as inquiry-stage questions — after sample approval, they become commitments.
- Keep the photo trail. The before-photos, the evaluation-sheet scans, and the signed record stay in the order file. Six months from now, when a question about this season's order arises, that file answers it without a single memory-dependent conference call.
Handled this way, one good sample does the work of a hundred arguments: it fixes color, density, cap behavior, and knot standard in a single physical object that every future order of yours can be measured against.
FAQ
Sample Evaluation Questions Buyers Ask
Plan for a single uninterrupted session rather than scattered glances between clients. Most of the physical checks on this list are completed in one focused pass under neutral daylight, and the wear test adds the wearing time you need for cap and hairline judgements. What stretches the timeline is the correction round, not the inspection itself.
Treat a color deviation against the tolerance written in your brief rather than assuming it is minor or correctable. Photograph the sample beside the approved swatch under neutral light, record the difference, and ask the factory to confirm whether a corrected sample is required before production. Approve only when the agreed correction and acceptance route are documented.
The approval is your written decision after evaluating the sample. A golden sample is a physical reference retained after approval. It becomes a controlling production reference only when both parties identify it clearly and agree in writing how it will be used alongside the purchase specification.
The sample decision and the incoming check are two different layers. Confirm with the factory during inquiry what inspection is performed on each unit before shipment and whether it is documented per unit or sampled, and ask for a specification sheet to check goods against on arrival. Your approved sample is the reference that makes that incoming check fast.
Yes, and it is a strong arrangement. A macher handles construction daily and can judge knot work, density, and hairline behaviour faster than a general buyer. Pair the macher's hands-on judgement with your own written record so the factory still receives measurable, documented findings rather than verbal impressions.
Closing
A Record That Protects Both Sides of the Order
The buyers whose production orders arrive right are not the ones with the sharpest eye — they are the ones whose approval rests on a written brief, a measured record, and a sealed reference. Every checkpoint in this guide exists to convert one good evaluation into a whole season of units that match it.
Use the same documented process for every sample and the comparisons become more consistent over time. Your supplier receives clearer tolerances, and your team can judge future samples against records rather than memory.

Have a Sample on Your Desk Right Now?
LEV Wigs builds lace top sheitels to a confirmed written specification, and our sample terms are agreed before your studio evaluates construction. Send us your evaluation record and we will answer every line.
Request a Sample ReviewSubmit Wholesale Specifications